底部標籤導航器
螢幕底部的一個簡單標籤列,可讓您在不同的路由之間切換。路由會延遲初始化——它們的螢幕組件在首次聚焦之前不會掛載。
安裝
要使用此導航器,請確保您已安裝@react-navigation/native及其依賴項(請依照本指南),然後安裝@react-navigation/bottom-tabs
- npm
- Yarn
- pnpm
npm install @react-navigation/bottom-tabs
yarn add @react-navigation/bottom-tabs
pnpm add @react-navigation/bottom-tabs
用法
要使用此導航器,請從@react-navigation/bottom-tabs匯入它
- 靜態
- 動態
import { createBottomTabNavigator } from '@react-navigation/bottom-tabs';

const MyTabs = createBottomTabNavigator({
  screens: {
    Home: HomeScreen,
    Profile: ProfileScreen,
  },
});
import { createBottomTabNavigator } from '@react-navigation/bottom-tabs';

const Tab = createBottomTabNavigator();

function MyTabs() {
  return (
    <Tab.Navigator>
      <Tab.Screen name="Home" component={HomeScreen} />
      <Tab.Screen name="Profile" component={ProfileScreen} />
    </Tab.Navigator>
  );
}
API 定義
Props
除了所有導航器共用的通用 props之外,底部標籤導航器還接受以下額外 props
backBehavior
這控制了在導航器中呼叫goBack時會發生什麼事。這包括按下裝置的返回按鈕或 Android 上的返回手勢。
它支援以下值
firstRoute- 返回導航器中定義的第一個螢幕(預設)initialRoute- 返回在initialRouteNameprop 中傳遞的初始螢幕,如果未傳遞,則預設為第一個螢幕order- 返回在聚焦螢幕之前定義的螢幕history- 返回導航器中最後訪問的螢幕;如果同一個螢幕被多次訪問,則較舊的條目會從歷史記錄中刪除none- 不處理返回按鈕
detachInactiveScreens
布林值,用於指示是否應將非活動螢幕從視圖層次結構中分離以節省記憶體。這可以與react-native-screens整合。預設值為true。
tabBar
傳回 React 元素以顯示為標籤列的函式。
該函式接收一個物件,其中包含以下屬性作為參數
state- 標籤導航器的狀態物件。descriptors- 描述器物件,包含標籤導航器的選項。navigation- 標籤導航器的導航物件。
state.routes陣列包含導航器中定義的所有路由。可以使用descriptors[route.key].options存取每個路由的選項。
範例
- 靜態
- 動態
import { View, Platform } from 'react-native';
import { useLinkBuilder, useTheme } from '@react-navigation/native';
import { Text, PlatformPressable } from '@react-navigation/elements';
import { createBottomTabNavigator } from '@react-navigation/bottom-tabs';

function MyTabBar({ state, descriptors, navigation }) {
  const { colors } = useTheme();
  const { buildHref } = useLinkBuilder();

  return (
    <View style={{ flexDirection: 'row' }}>
      {state.routes.map((route, index) => {
        const { options } = descriptors[route.key];
        const label =
          options.tabBarLabel !== undefined
            ? options.tabBarLabel
            : options.title !== undefined
              ? options.title
              : route.name;

        const isFocused = state.index === index;

        const onPress = () => {
          const event = navigation.emit({
            type: 'tabPress',
            target: route.key,
            canPreventDefault: true,
          });

          if (!isFocused && !event.defaultPrevented) {
            navigation.navigate(route.name, route.params);
          }
        };

        const onLongPress = () => {
          navigation.emit({
            type: 'tabLongPress',
            target: route.key,
          });
        };

        return (
          <PlatformPressable
            href={buildHref(route.name, route.params)}
            accessibilityState={isFocused ? { selected: true } : {}}
            accessibilityLabel={options.tabBarAccessibilityLabel}
            testID={options.tabBarButtonTestID}
            onPress={onPress}
            onLongPress={onLongPress}
            style={{ flex: 1 }}
          >
            <Text style={{ color: isFocused ? colors.primary : colors.text }}>
              {label}
            </Text>
          </PlatformPressable>
        );
      })}
    </View>
  );
}

const MyTabs = createBottomTabNavigator({
  tabBar: (props) => <MyTabBar {...props} />,
  screens: {
    Home: HomeScreen,
    Profile: ProfileScreen,
  },
});
import { View, Platform } from 'react-native';
import { useLinkBuilder, useTheme } from '@react-navigation/native';
import { Text, PlatformPressable } from '@react-navigation/elements';
import { createBottomTabNavigator } from '@react-navigation/bottom-tabs';

function MyTabBar({ state, descriptors, navigation }) {
  const { colors } = useTheme();
  const { buildHref } = useLinkBuilder();

  return (
    <View style={{ flexDirection: 'row' }}>
      {state.routes.map((route, index) => {
        const { options } = descriptors[route.key];
        const label =
          options.tabBarLabel !== undefined
            ? options.tabBarLabel
            : options.title !== undefined
              ? options.title
              : route.name;

        const isFocused = state.index === index;

        const onPress = () => {
          const event = navigation.emit({
            type: 'tabPress',
            target: route.key,
            canPreventDefault: true,
          });

          if (!isFocused && !event.defaultPrevented) {
            navigation.navigate(route.name, route.params);
          }
        };

        const onLongPress = () => {
          navigation.emit({
            type: 'tabLongPress',
            target: route.key,
          });
        };

        return (
          <PlatformPressable
            href={buildHref(route.name, route.params)}
            accessibilityState={isFocused ? { selected: true } : {}}
            accessibilityLabel={options.tabBarAccessibilityLabel}
            testID={options.tabBarButtonTestID}
            onPress={onPress}
            onLongPress={onLongPress}
            style={{ flex: 1 }}
          >
            <Text style={{ color: isFocused ? colors.primary : colors.text }}>
              {label}
            </Text>
          </PlatformPressable>
        );
      })}
    </View>
  );
}

function MyTabs() {
  return (
    <Tab.Navigator
      tabBar={(props) => <MyTabBar {...props} />}
    >
      <Tab.Screen name="Home" component={HomeScreen} />
      <Tab.Screen name="Profile" component={ProfileScreen} />
    </Tab.Navigator>
  );
}
此範例將呈現一個帶有標籤的基本標籤列。
請注意,您無法在tabBar內使用useNavigation hook,因為useNavigation僅在螢幕內可用。您會獲得一個navigation prop 用於您的tabBar,您可以改用它
function MyTabBar({ navigation }) {
  return (
    <Button
      onPress={() => {
        // Navigate using the `navigation` prop that you received
        navigation.navigate('SomeScreen');
      }}
    >
      Go somewhere
    </Button>
  );
}
選項
以下選項可用於設定導航器中的螢幕。這些可以在Tab.navigator的screenOptions prop 或Tab.Screen的options prop 下指定。
title
通用標題,可以用作headerTitle和tabBarLabel的後備。
tabBarLabel
標籤列中顯示的標籤的標題字串,或一個函式,給定{ focused: boolean, color: string },傳回一個 React.Node,以在標籤列中顯示。未定義時,使用場景title。要隱藏,請參閱tabBarShowLabel。
tabBarShowLabel
標籤標籤是否應該可見。預設值為true。
tabBarLabelPosition
標籤是顯示在圖示下方還是圖示旁邊。
預設情況下,位置會根據裝置寬度自動選擇。
-
below-icon:標籤顯示在圖示下方(iPhone 的典型情況)
-
beside-icon標籤顯示在圖示旁邊(iPad 的典型情況)
tabBarLabelStyle
標籤標籤的樣式物件。

範例
    tabBarLabelStyle: {
      fontSize: 16,
      fontFamily: 'Georgia',
      fontWeight: 300,
    },
tabBarIcon
函式,給定{ focused: boolean, color: string, size: number },傳回一個 React.Node,以在標籤列中顯示。
tabBarIconStyle
標籤圖示的樣式物件。
tabBarBadge
在標籤圖示上的徽章中顯示的文字。接受string或number。

tabBarBadgeStyle
標籤圖示上的徽章樣式。您可以在此處指定背景顏色或文字顏色。

範例
    tabBarBadgeStyle: {
      color: 'black',
      backgroundColor: 'yellow',
    },
tabBarAccessibilityLabel
標籤按鈕的輔助功能標籤。當使用者點擊標籤時,螢幕閱讀器會讀取此標籤。如果您沒有標籤的標籤,建議設定此標籤。
tabBarButton
傳回 React 元素以呈現為標籤列按鈕的函式。它包裝了圖示和標籤。預設情況下呈現Pressable。
您可以在此處指定自訂實作
tabBarButton: (props) => <TouchableOpacity {...props} />;
tabBarButtonTestID
在測試中定位此標籤按鈕的 ID。
tabBarActiveTintColor
活動標籤中圖示和標籤的顏色。

tabBarInactiveTintColor
非活動標籤中圖示和標籤的顏色。

tabBarActiveBackgroundColor
活動標籤的背景顏色。
tabBarInactiveBackgroundColor
非活動標籤的背景顏色。
tabBarHideOnKeyboard
鍵盤開啟時是否隱藏標籤列。預設值為false。
tabBarItemStyle
標籤項目容器的樣式物件。
tabBarStyle
標籤列的樣式物件。您可以在此處設定背景顏色等樣式。
若要在標籤列下方顯示螢幕,您可以將position樣式設定為 absolute
<Tab.Navigator
  screenOptions={{
    tabBarStyle: { position: 'absolute' },
  }}
>
如果您的標籤列是絕對定位的,您可能還需要在內容中新增底部邊距。React Navigation 不會自動執行此操作。有關更多詳細資訊,請參閱useBottomTabBarHeight。
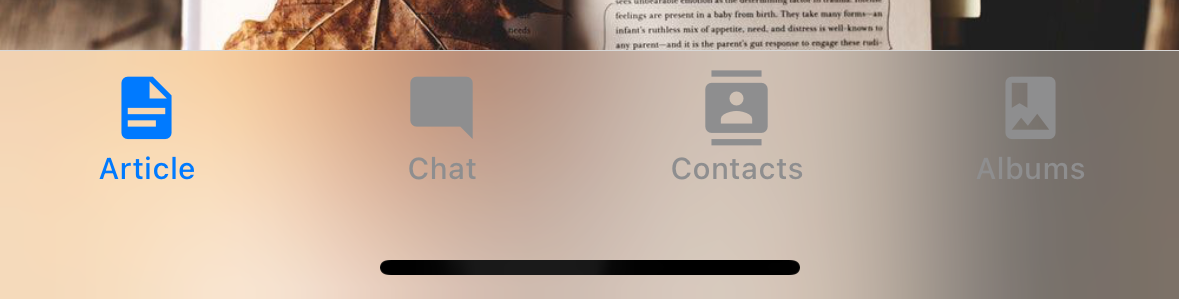
tabBarBackground
傳回 React 元素以用作標籤列背景的函式。您可以呈現影像、漸層、模糊視圖等。
import { BlurView } from 'expo-blur';

// ...

<Tab.Navigator
  screenOptions={{
    tabBarStyle: { position: 'absolute' },
    tabBarBackground: () => (
      <BlurView tint="light" intensity={100} style={StyleSheet.absoluteFill} />
    ),
  }}
>
使用BlurView時,請務必也在tabBarStyle中設定position: 'absolute'。您還需要使用useBottomTabBarHeight來為您的內容新增底部 padding。
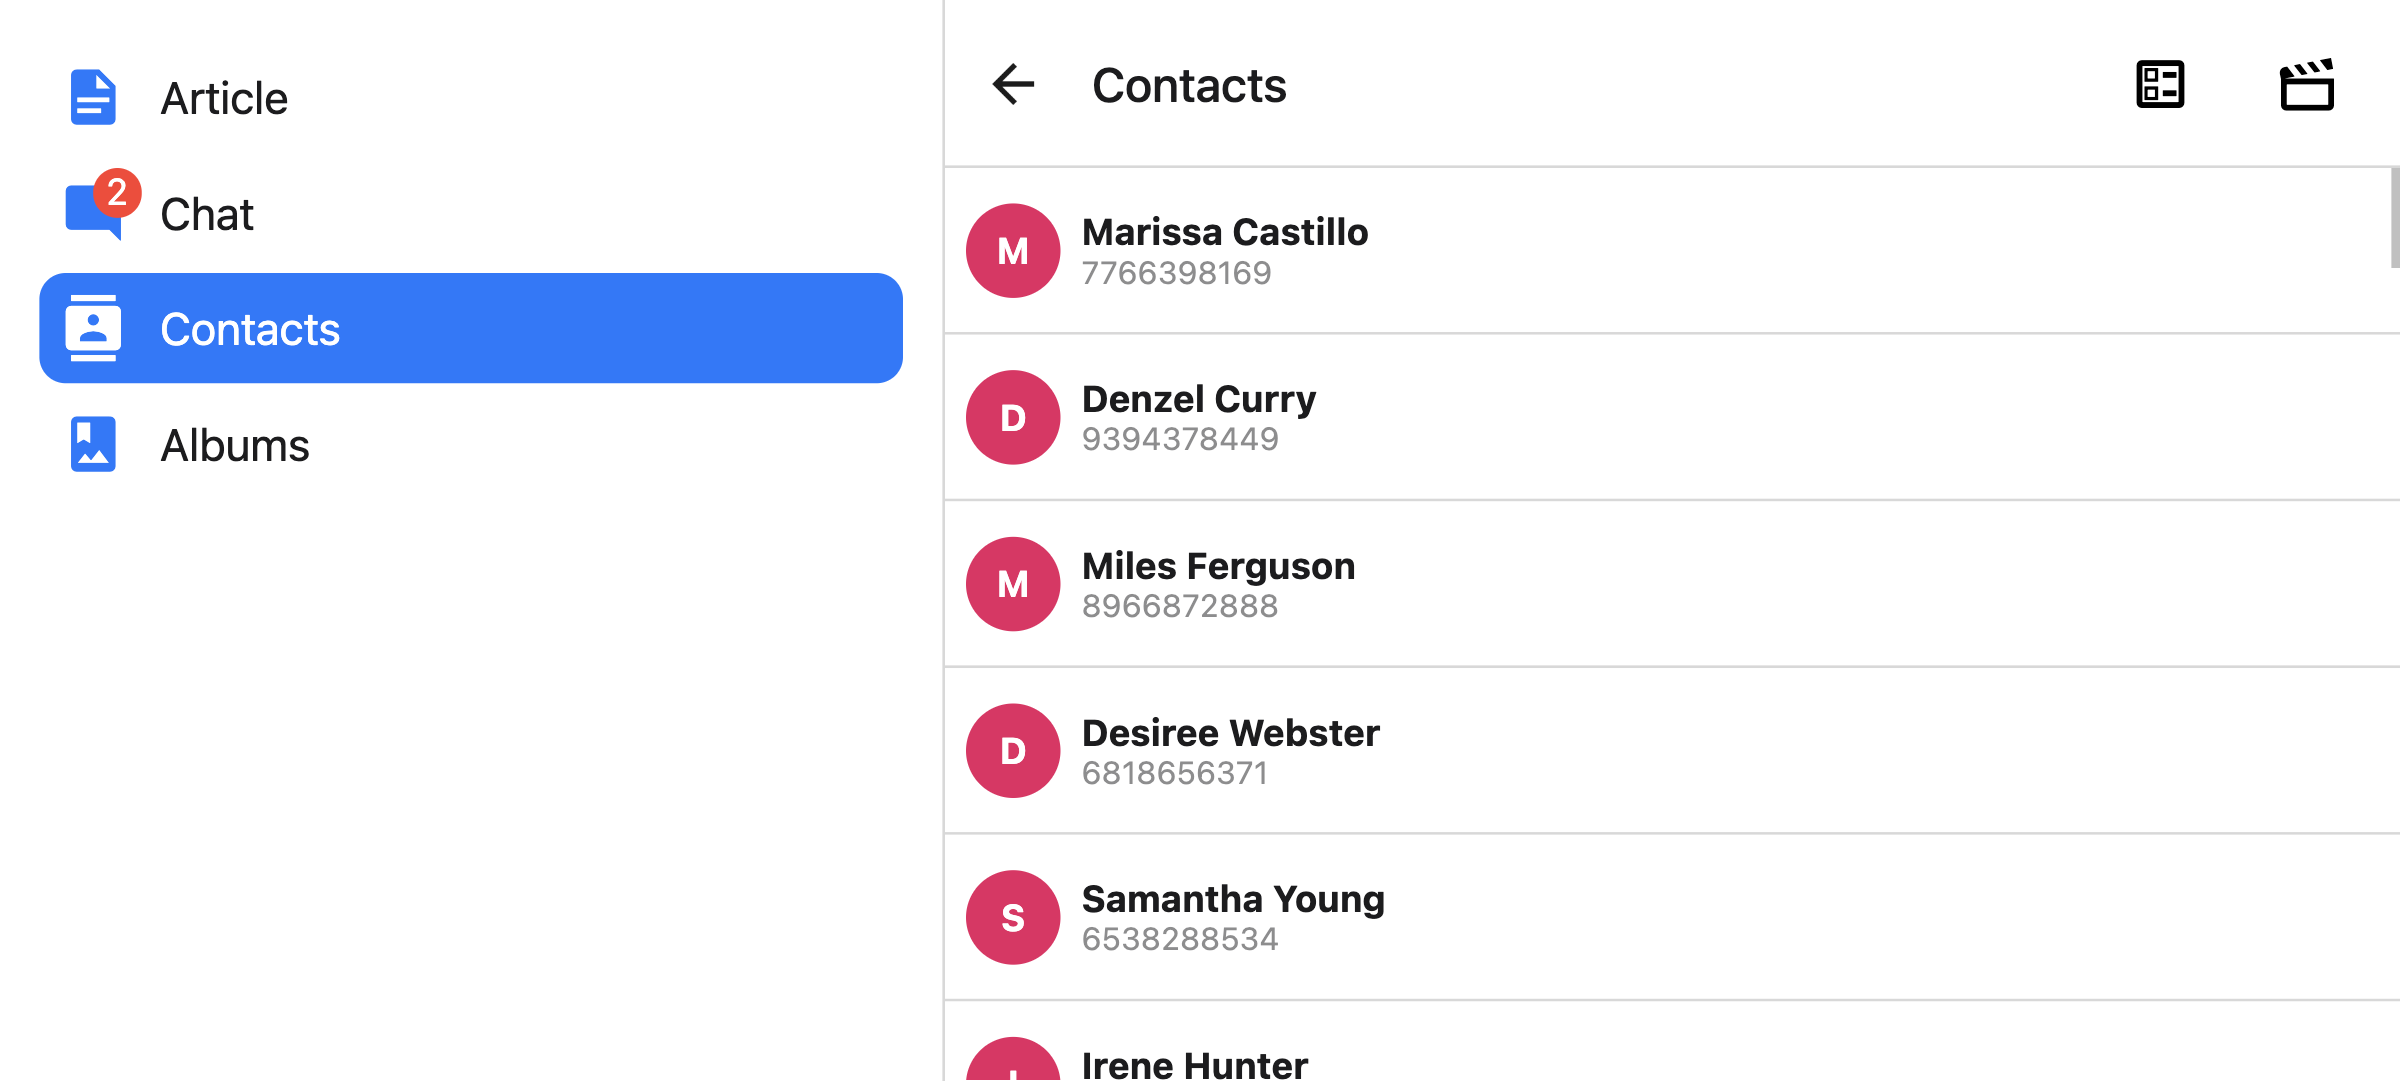
tabBarPosition
標籤列的位置。可用值為
bottom(預設)topleftright
當標籤列位於left或right時,其樣式會設定為側邊欄。當您想要在較大的螢幕上顯示側邊欄,在較小的螢幕上顯示底部標籤列時,這會很有用
- 靜態
- 動態
const Tabs = createBottomTabNavigator({
  screenOptions: {
    tabBarPosition: isLargeScreen ? 'left' : 'bottom',
  },

  // ...
});
<Tab.Navigator
  screenOptions={{
    tabBarPosition: isLargeScreen ? 'left' ? 'bottom',
  }}
>
您也可以透過將標籤放在圖示下方來呈現精簡的側邊欄。這僅在tabBarVariant設定為material時才支援
- 靜態
- 動態
const Tabs = createBottomTabNavigator({
  screenOptions: {
    tabBarPosition: isLargeScreen ? 'left' ? 'bottom',
    tabBarVariant: isLargeScreen ? 'material' : 'uikit',
    tabBarLabelPosition: 'below-icon',
  },

  // ...
});
<Tab.Navigator
  screenOptions={{
    tabBarPosition: dimensions.width < 600 ? 'bottom' : 'left',
    tabBarLabelPosition: 'below-icon',
  }}
>

tabBarVariant
標籤列的變體。可用值為
uikit(預設)- 標籤列的樣式將根據 iOS UIKit 指南設定。material- 標籤列的樣式將根據 Material Design 指南設定。
目前僅當tabBarPosition設定為left或right時,才支援material變體。

lazy
此螢幕是否應僅在第一次存取後才呈現。預設值為true。如果您希望在導航器的初始呈現時呈現螢幕,請將其設定為false。
freezeOnBlur
布林值,指示是否防止非活動螢幕重新呈現。預設值為false。當應用程式頂端執行react-native-screens套件的enableFreeze()時,預設值為true。
僅在 iOS 和 Android 上支援。
popToTopOnBlur
布林值,指示在離開此標籤時,是否應將任何巢狀堆疊彈出到堆疊頂端。預設值為false。
它僅在標籤導航器下方巢狀有堆疊導航器(例如堆疊導航器或原生堆疊導航器)時才有效。
sceneStyle
用於包裝螢幕內容的組件的樣式物件。
標頭相關選項
您可以在此處找到標頭相關選項的清單。這些選項可以在Tab.navigator的screenOptions prop 或Tab.Screen的options prop 下指定。您不必直接使用@react-navigation/elements即可使用這些選項,它們只是記錄在該頁面中。
除了這些選項之外,底部標籤也支援以下選項
header
自訂標頭以取代預設標頭。
這接受一個函式,該函式傳回一個 React 元素以顯示為標頭。該函式接收一個物件,其中包含以下屬性作為參數
navigation- 目前螢幕的導航物件。route- 目前螢幕的路由物件。options- 目前螢幕的選項layout- 螢幕的尺寸,包含height和width屬性。
範例
import { getHeaderTitle } from '@react-navigation/elements';

// ..

header: ({ navigation, route, options }) => {
  const title = getHeaderTitle(options, route.name);

  return <MyHeader title={title} style={options.headerStyle} />;
};
若要為導航器中的所有螢幕設定自訂標頭,您可以在導航器的screenOptions prop 中指定此選項。
在headerStyle中指定height
如果您的自訂標頭高度與預設標頭高度不同,那麼您可能會注意到由於測量是異步的而導致的故障。明確指定高度將避免此類故障。
範例
headerStyle: {
  height: 80, // Specify the height of your custom header
};
請注意,此樣式預設不會套用至標頭,因為您可以控制自訂標頭的樣式。如果您也想將此樣式套用至標頭,請使用 props 中的options.headerStyle。
headerShown
是否顯示或隱藏螢幕的標頭。預設情況下會顯示標頭。將其設定為false會隱藏標頭。
事件
導航器可以在某些動作上發出事件。支援的事件為
tabPress
當使用者按下標籤列中目前螢幕的標籤按鈕時,會觸發此事件。預設情況下,按下標籤會執行多項操作
- 如果標籤未聚焦,按下標籤將聚焦該標籤
- 如果標籤已聚焦
- 如果標籤的螢幕呈現捲動視圖,您可以使用
useScrollToTop將其捲動到頂端 - 如果標籤的螢幕呈現堆疊導航器,則會在堆疊上執行
popToTop動作
- 如果標籤的螢幕呈現捲動視圖,您可以使用
若要防止預設行為,您可以呼叫event.preventDefault
React.useEffect(() => {
  const unsubscribe = navigation.addListener('tabPress', (e) => {
    // Prevent default behavior
    e.preventDefault();

    // Do something manually
    // ...
  });

  return unsubscribe;
}, [navigation]);
如果您有自訂標籤列,請務必發出此事件。
tabLongPress
當使用者長時間按下標籤列中目前螢幕的標籤按鈕時,會觸發此事件。如果您有自訂標籤列,請務必發出此事件。
範例
React.useEffect(() => {
  const unsubscribe = navigation.addListener('tabLongPress', (e) => {
    // Do something
  });

  return unsubscribe;
}, [navigation]);
輔助函式
標籤導航器會將以下方法新增至導航物件
jumpTo
導航到標籤導航器中的現有螢幕。該方法接受以下參數
name- 字串 - 要跳轉到的路由名稱。params- 物件 - 用於目的地路由的螢幕參數。
navigation.jumpTo('Profile', { owner: 'Michaś' });
Hook
底部標籤導航器匯出以下 hook
useBottomTabBarHeight
此 hook 傳回底部標籤列的高度。預設情況下,螢幕內容不會在標籤列下方。但是,如果您想將標籤列絕對定位並讓內容在其下方(例如,顯示模糊效果),則必須調整內容以考慮標籤列高度。
範例
import { useBottomTabBarHeight } from '@react-navigation/bottom-tabs';

function MyComponent() {
  const tabBarHeight = useBottomTabBarHeight();

  return (
    <ScrollView contentStyle={{ paddingBottom: tabBarHeight }}>
      {/* Content */}
    </ScrollView>
  );
}
或者,如果您使用的是類別組件或需要在可在底部標籤導航器外部重複使用的組件中使用它,則可以直接使用BottomTabBarHeightContext
import { BottomTabBarHeightContext } from '@react-navigation/bottom-tabs';

// ...

<BottomTabBarHeightContext.Consumer>
  {tabBarHeight => (
    /* render something */
  )}
</BottomTabBarHeightContext.Consumer>
動畫
預設情況下,在標籤之間切換沒有任何動畫。您可以指定animation選項來自訂轉場動畫。
animation的支援值為
-
fade- 螢幕轉場效果的交叉淡入淡出動畫,其中新螢幕淡入,舊螢幕淡出。 -
shift- 螢幕轉場效果的滑動動畫,其中螢幕稍微向左/向右滑動。 -
none- 螢幕轉場效果沒有任何動畫。這是預設值。
- 靜態
- 動態
const RootTabs = createBottomTabNavigator({
  screenOptions: {
    animation: 'fade',
  },
  screens: {
    Home: HomeScreen,
    Profile: ProfileScreen,
  },
});
function RootTabs() {
  return (
    <Tab.Navigator
      screenOptions={{
        animation: 'fade',
      }}
    >
      <Tab.Screen name="Home" component={HomeScreen} />
      <Tab.Screen name="Profile" component={ProfileScreen} />
    </Tab.Navigator>
  );
}
如果您需要更精細地控制動畫,您可以使用各種動畫相關選項自訂動畫的各個部分
動畫相關選項
底部標籤導航器公開了各種選項,用於設定切換標籤時的轉場動畫。可以透過在每個螢幕的options中指定選項,或透過在screenOptions中指定它們來為標籤導航器中的所有螢幕自訂這些轉場動畫。
-
transitionSpec- 一個物件,用於指定動畫類型(timing或spring)及其選項(例如timing的duration)。它包含 2 個屬性animation- 用於動畫的動畫函式。支援的值為timing和spring。config- 定時函式的設定物件。對於timing,它可以是duration和easing。對於spring,它可以是stiffness、damping、mass、overshootClamping、restDisplacementThreshold和restSpeedThreshold。
使用定時動畫的設定看起來像這樣
const config = {
  animation: 'timing',
  config: {
    duration: 150,
    easing: Easing.inOut(Easing.ease),
  },
};
我們可以在
transitionSpec選項中傳遞此設定- 靜態
- 動態
{
  Profile: {
    screen: Profile,
    options: {
      transitionSpec: {
        animation: 'timing',
        config: {
          duration: 150,
          easing: Easing.inOut(Easing.ease),
        },
      },
    },
  },
}<Tab.Screen
name="Profile"
component={Profile}
options={{
transitionSpec: {
animation: 'timing',
config: {
duration: 150,
easing: Easing.inOut(Easing.ease),
},
},
}}
/> -
sceneStyleInterpolator- 這是一個函式,用於指定場景各個部分的內插樣式。它目前支援包含螢幕的視圖的樣式sceneStyle- 用於包裝螢幕內容的容器視圖的樣式。
該函式在其參數中接收以下屬性
current- 目前螢幕的動畫值progress- 代表目前螢幕進度值的動畫節點。
淡化螢幕的設定看起來像這樣
const forFade = ({ current }) => ({
  sceneStyle: {
    opacity: current.progress.interpolate({
      inputRange: [-1, 0, 1],
      outputRange: [0, 1, 0],
    }),
  },
});current.progress的值如下- 如果索引低於活動標籤,則為 -1,
- 如果它們處於活動狀態,則為 0,
- 如果索引高於活動標籤,則為 1
我們可以在
sceneStyleInterpolator選項中傳遞此函式- 靜態
- 動態
{
  Profile: {
    screen: Profile,
    options: {
      sceneStyleInterpolator: ({ current }) => ({
        sceneStyle: {
          opacity: current.progress.interpolate({
            inputRange: [-1, 0, 1],
            outputRange: [0, 1, 0],
          }),
        },
      }),
    },
  },
}<Tab.Screen
name="Profile"
component={Profile}
options={{
sceneStyleInterpolator: ({ current }) => ({
sceneStyle: {
opacity: current.progress.interpolate({
inputRange: [-1, 0, 1],
outputRange: [0, 1, 0],
}),
},
}),
}}
/>
將這些放在一起,您可以自訂螢幕的轉場動畫
- 靜態
- 動態
const RootTabs = createBottomTabNavigator({
  screenOptions: {
    transitionSpec: {
      animation: 'timing',
      config: {
        duration: 150,
        easing: Easing.inOut(Easing.ease),
      },
    },
    sceneStyleInterpolator: ({ current }) => ({
      sceneStyle: {
        opacity: current.progress.interpolate({
          inputRange: [-1, 0, 1],
          outputRange: [0, 1, 0],
        }),
      },
    }),
  },
  screens: {
    Home: HomeScreen,
    Profile: ProfileScreen,
  },
});
function RootTabs() {
  return (
    <Tab.Navigator
      screenOptions={{
        transitionSpec: {
          animation: 'timing',
          config: {
            duration: 150,
            easing: Easing.inOut(Easing.ease),
          },
        },
        sceneStyleInterpolator: ({ current }) => ({
          sceneStyle: {
            opacity: current.progress.interpolate({
              inputRange: [-1, 0, 1],
              outputRange: [0, 1, 0],
            }),
          },
        }),
      }}
    >
      <Tab.Screen name="Home" component={HomeScreen} />
      <Tab.Screen name="Profile" component={ProfileScreen} />
    </Tab.Navigator>
  );
}
預先製作的設定
我們還從函式庫匯出各種設定,其中包含現成的設定,您可以用於自訂動畫
TransitionSpecs
FadeSpec- 用於螢幕之間交叉淡入淡出動畫的設定。ShiftSpec- 用於螢幕之間滑動動畫的設定。
範例
- 靜態
- 動態
import { TransitionSpecs } from '@react-navigation/bottom-tabs';

// ...

{
  Profile: {
    screen: Profile,
    options: {
      transitionSpec: TransitionSpecs.CrossFadeSpec,
    },
  },
}
import { TransitionSpecs } from '@react-navigation/bottom-tabs';

// ...

<Tab.Screen
  name="Profile"
  component={Profile}
  options={{
    transitionSpec: TransitionSpecs.FadeSpec,
  }}
/>;
SceneStyleInterpolators
forFade- 螢幕轉場效果的交叉淡入淡出動畫,其中新螢幕淡入,舊螢幕淡出。forShift- 螢幕轉場效果的滑動動畫,其中螢幕稍微向左/向右滑動。
範例
- 靜態
- 動態
import { SceneStyleInterpolators } from '@react-navigation/bottom-tabs';

// ...

{
  Profile: {
    screen: Profile,
    options: {
      sceneStyleInterpolator: SceneStyleInterpolators.forFade,
    },
  },
}
import { SceneStyleInterpolators } from '@react-navigation/bottom-tabs';

// ...

<Tab.Screen
  name="Profile"
  component={Profile}
  options={{
    sceneStyleInterpolator: SceneStyleInterpolators.forFade,
  }}
/>;
TransitionPresets
我們匯出轉場預設,這些預設將各種選項集合捆綁在一起。轉場預設是一個物件,其中包含在TransitionPresets下匯出的一些動畫相關螢幕選項。目前提供以下預設
FadeTransition- 螢幕轉場效果的交叉淡入淡出動畫,其中新螢幕淡入,舊螢幕淡出。ShiftTransition- 螢幕轉場效果的滑動動畫,其中螢幕稍微向左/向右滑動。
您可以將這些預設值分散在options中,以自訂螢幕的動畫
範例
- 靜態
- 動態
import { TransitionPresets } from '@react-navigation/bottom-tabs';

// ...

{
  Profile: {
    screen: Profile,
    options: {
      ...TransitionPresets.FadeTransition,
    },
  },
}
import { TransitionPresets } from '@react-navigation/bottom-tabs';

// ...

<Tab.Screen
  name="Profile"
  component={Profile}
  options={{
    ...TransitionPresets.FadeTransition,
  }}
/>;